Thursday, 11 June 2015
Friday, 5 June 2015
Evaluation of 3D animation
Evaluation
of 3D Animation
In this report, I am going to
evaluate my 3D animation project and talk about what I did, where I had come
across difficulties and where I could improve for next time when I do animation
at a Bachelor Honour’s degree level.
To begin my 3D animation work, my
group and I had to discuss a story that would involve three characters at least.
We also had to find some rigs that we could use in Maya. I had found one very
useful rig to download for free called the Andy rig; it allowed me to change
the clothes, IK chains and gender. The face sliders were very useful to express
different emotions like joy, sadness, anger, disgust, shock, and happiness as I
could manipulate the eyes, the eyebrows, the mouth, the tongue, and teeth. The
website I found this was on creative crash.
We then came up with two possible stories; one that involved a man, a genie, and a woman, and another involved a couple of friends and an old man. Thinking on which was the best animation to produce that was simple, we decided on using the friends and old man story. This was about two friends, one who was good a football; the other isn’t. We discussed that the first friend (my character) would kick the ball from right to left and the other friend would kick the ball poorly. I had my character run in to the scene and see her friend tired out. She looks sad and has an idea to help her friend kick the ball. She shows her how to, and gestures her to try it. The other friend then has a go at kicking the ball and ends up kicking it further than she intended. We see a short scene where an old man is painting on a canvas, to which suddenly the ball comes hurtling down from behind and destroys it. Angry, he kicks the ball back at the girls and hits them both.
We found this story to be very useful because we could have a character each to work on in scenes and concentrate on animating one thing to get better results.
Next, we had to create test rigs for our characters. I had created a walk test to show the fluidity and the speed of how I was going to animate my character. The comments fed back to me stated that the walk cycle had her doing a weird head bop movement whenever she reached the contact point. She also had a weird leg snap that happened only because the knee pivots weren’t moving at all, and the IK chain in the middle of the leg tried to follow that. Learning from this I had considered what I was going to do when I came to animating.
Next, I had made a test render for the lighting in the scene. I had struggled with this part the most as I am not used to making lights in scenes. Running low on time, one of my group members had created a scene that we were all going to use, and I used this to test the lighting. I had found that the lighting was good for this particular scene and decided to keep it the same as it was made originally.
The next step was to create a series of playblasts for blocking out the scenes to see what the characters were going to do. I had accidently saved over previous playblasts and couldn’t show these previous files. Instead, I had showed how I was animating the project as a development.
I still received feedback from my playblasts, and I could use them. The first playblasts I showed had the girl run into the scene and make a crouching action, which did not look comfortable. I agreed with the feedback and discussed about what I could do to improve the animation, like adding in a skid and a follow through motion. The second playblast of this apparently looked better with the follow through of the girl when she immediately stops before the ball, but the motion of her stopping looked dramatic, as she thrusts her body into the air and making an uncomfortable bend in her body. I then redid this by making her body go straight and fall back and add more secondary motion in. They commented throughout this that the arcs on the arm swings were particularly effective.
The second scene according to the group critique was good and didn’t need improving too much, only saying that there needed to be expressions in her face.
My final scene I had to animate, the girl slid about when she kicked the ball. This was due to the Master controller being moved. They commented that the legs needed to move in this scene. Admittedly, I needed help to figure out how I was going to make the feet move around. It was suggested that the legs and arms needed to be FK chains instead. I agreed that the arms but disagreed with the legs because the feet controllers would give me more lenience to use the foot rolls and toe lifts when she moves.
Once my animation was done, I had to render each scene out individually. I had looked through the available renderers for the scene. Using the Maya Software render looked undetailed for the character rig, but the grass in the scene had appeared whereas using Mental Ray showed the detail of the character model, at the cost of not showing any grass. I decided to then render without the grass fur showing.
Throughout this animation process,
I have learnt new techniques in Maya. I had enjoyed using the downloaded rig as
it had a lot of uses in morphing nicely, allowing me to add interaction with
objects like the ball and make a nice scene to render out. I knew that using
one that I’d make up would have taken a long time to model and making sure it’d
work. For when I do 3D animation next time, I would consider how I’d make my
scenes and think carefully about using FK more than IK if I want to achieve
adding in more principles of animation.
Thursday, 4 June 2015
Putting together the animation
Once all my scenes were animated, I then had to render them out. I had little knowledge of rendering out files in Maya. I had realised that Maya could only render out image sequences that could then be placed in programs that make auto image sequences like Premiere.
I had selected the file to render out as jpeg images that suited the file size to 1080i pixels; this would give the video quality.
I had no trouble whatsoever when rendering out my animation. Learning from my Visual Effects, I knew the process of rendering out to a file location by editing the project imagery directory. It was then helpful for me to then change the preference of what the file names would look like when they rendered. I had named them to be the project name, the numbered frame and the file type.
I set these scenes to render which took as little as an hour to do for each scene.
Once I had the scenes rendered, I imported them as image sequences into Adobe Premiere. Importing them as jpegs alone would not be suitable as each imported image was defaulted to over an frame long.
I then placed all three scenes together and found soundtrack on youtube to use for the animation; finding running on grass sounds, ball hitting the grass sounds, a ding sound, and a ball being kicked sound too. I had added a "Tada" sound at the end for comedy.
During this, I encountered a small problem. I had forgotten to redo the ball in the first scene to bounce in at a slower speed. I stretched the frames out and and rendered them to overlap the previous jpeg images. It worked well but when re-importing them into Premiere, the frames 17-30 were missing the ball moving. It was an unknown error but to fix this, the program was restarted and worked well.
After everything was done, I exported the finished footage as a .MOV file with a H264 codec for quality and compatibility.
Animating the character
Whilst animating my character, I had live feedback from colleagues helping me in animating the scenes. I will discuss what I had done, what was noticed and where I needed to improve on.
First feedback
From my colleagues, they had seen one of my blocked out scenes of my character running into the scene. She had originally skidded in, crouched, and recovered. The comments were that the crouching looked very disgruntled and that she needed to have a better skidding action as she comes in. Looking for reference in this was suggested the most.
The next scene they saw had been perfect and that nothing else needed to be changed about this. The character was thinking and doing a "aha!" action like she had a sudden idea of how to help her friend.
The final scene had the girl showing her friend how to kick the ball. This was commented on that the girl slides too much in the scene and that she needed to actually step backwards. Also, they had commented on the fact that the girl's arm movements also looked wrong in IK. It was acknowledged that I was to use FK for this.
Second feedback
Improving on the first scene, my colleagues had noted that the scene in which the girl skids in and recovers was over the top and that it needed to be less dramatic. Following this advice, I made sure that when the girl pulled herself up, she didn't have a motion that looked as though she broke her back.
My third scene was commented on that the girl when kicking the ball made a uncomfortable stepping motion when aiming to kick the ball. They had commented that she looked as though she was stomping around. I was also advised that the character didn't need to take a step up to the ball, but just make a arc of the leg swing to hit the ball from where she stood.
Taking this feedback on, I had improved the scenes and was ready to render my animation out.
Choosing to animate the scenes
Because there were three people (including myself) in the group, we all decided to animate a character each and chose to animate scenes where the character was most prominent.
Because my character was first, I decided on animating the first scene. I gave the task of the other two scenes to be animated by the others.
The animatic
Below is a gif of the animatic sequence I was intending to animate.
 I intended on using a female character because I wanted to express the secondary motion with the ponytail flowing in motion. I had also intended for one of my group mates to use their character in the same scene too, tiring out after running in. The animatic helped me to think about what I wanted to put into my scene and what objects and scenery would affect the staging.
This was a list of objects I needed to include:
Ball
Grass
Sky
Goal post
Creating the scene
One of my group members managed to create a successful scene as I had difficulty using Maya to make one. I had found a way to create grass but the scene had too many grass elements in it and when it came to rendering out a preview image, the computer could not do it and the program crashed.
Lighting
The lighting in the scene was also made by my group mate. I had trouble of using lights properly in Maya. From past experiences, I have never been able to use lighting correctly and how to control them in an environment. My group mate created a directional light that was pointing downwards onto the scene mimicing a sun light. The light tests are shown below.
 This first light test was to see where the light affected the scene. It seems to have cast a nice shadow from the character model.
Because my character was first, I decided on animating the first scene. I gave the task of the other two scenes to be animated by the others.
The animatic
Below is a gif of the animatic sequence I was intending to animate.

This was a list of objects I needed to include:
Ball
Grass
Sky
Goal post
Creating the scene
One of my group members managed to create a successful scene as I had difficulty using Maya to make one. I had found a way to create grass but the scene had too many grass elements in it and when it came to rendering out a preview image, the computer could not do it and the program crashed.
Lighting
The lighting in the scene was also made by my group mate. I had trouble of using lights properly in Maya. From past experiences, I have never been able to use lighting correctly and how to control them in an environment. My group mate created a directional light that was pointing downwards onto the scene mimicing a sun light. The light tests are shown below.

Downloaded Rig
As previously mentioned in this assignment, we had to each find a rig to download and use for this group project. I searched online for a simple rig by using a website called creative crash. I had found one that was rated by a lot of people as being useful. It is compatible to use in Maya. The arms, legs and spine could be changed from IK to FK if needed, the gender of the character and clothes are also changeable (choose from a boy character or a girl character). Below is the image of the website the rig came from and a series of images showing me using the rig and explaining the usefulness of it. The following web link is the website of where it came from.
(Note: tried to link the URL to actual website but creative crash claimed it was a non existent webpage. Please copy and paste into web URL when viewing.)
http://www.creativecrash.com/maya/downloads/character-rigs/c/the-andy-rig

The usefulness of the rig
Below are a series of GIF images showing the process of doing things with the rig.
When loading the rig in Maya, the file will set its renderer to Legacy Default Viewport, making it look low res. Ideally we want to change that to a higher res model by going to Renderer>Viewport 2.0. This will allow us to then choose the right settings for seeing the model in Maya. You can see the difference in the GIF below.
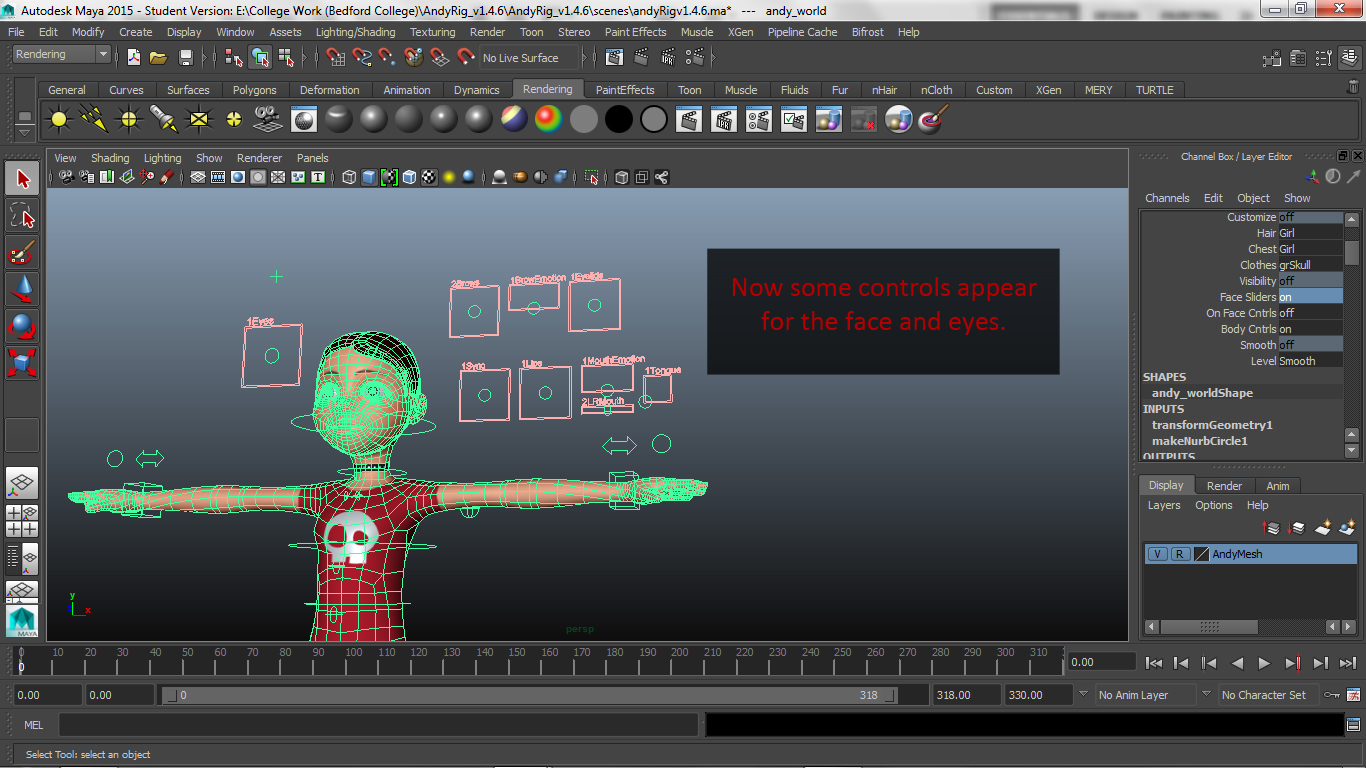
 Once the model is set up, we can tweak a few areas if needed. I can change the hairstyles and clothes of the character, turning it into a boy, girl, man or woman. The image below shows the channel editor box with areas we can manipulate. Not only can I change the clothes of the character model, but I can also change certain things around like adding face sliders (explained a little bit more below), on face controls (for more precise animating), smoothness and the level of that smoothness too. Below is a GIF of the changes I made to the clothes and hair.

 To animate the face, I need to turn on the face sliders. To do this is explained in a series of images below.

1. Select the Master Controller. This will bring up the list in which I can turn on the face sliders.
 2. Locate the Face Sliders control. Once I located it, I simply had to select the blue highlighted box and type "on".
 3. Find the face sliders next to the head. The face sliders appeared next to the head on the model.
Changing IK to FK on arms and legs
Sometimes animating using IK can be good to do, but personally using FK too can help in areas. Below are two playblasts I made of the left arm using IK and FK. There is also another couple of playblasts showing IK and FK on the left leg too.

 To choose between IK and FK on the arm and leg, I had to locate the double arrow pointing both directions. This was the controller to change between IK and FK and it is shown on the left.
Once selected, I had to go to the Channel editor and find the IK/FK editor. I had to type in either 0 or 1. 0 is for FK and 1 is for IK.
IK Arm
Using the IK chain on the arm made it easier to animate. Simply by selecting the hand controller (the green cube around the wrist) allowed me to either rotate or move the hand and arm to a position. I felt that this way it was easy to animate with, but less detailed than using an FK chain.
FK Arm
Using the FK chain was a little bit more complicated to do, but it had the detail supporting it. First I had to determine what I wanted the whole arm (shoulder, elbow and wrist) to do when the arm slumps down. I could only rotate the joints on the pivots only. This then allowed me to put in secondary motion and follow through when the arm goes down.
Concluding this bit, I found that using FK was a lot better than IK on the arm because the action I could put into the swing of the arm made it better with FK rather than IK.
IK Leg
I had also experimented with doing IK and FK legs. Using the IK allowed me to use move and rotate on the controller that shaped around the foot. If I wanted to, I could add in secondary motion with the channel box and manipulating the foot, toe and ball rolls when the foot lifted off the ground.
FK Leg
Using the FK on the leg was a lot more complicated as I had to think more about what I wanted the leg to do. It was hard to mimic the IK Leg's movement and resorted to doing a different motion entirely. I felt that this was still effective.
After this conclusion, I found that using IK was more suitable as I could control the pivots and rolls in between frames and keyframe them.
(Note: tried to link the URL to actual website but creative crash claimed it was a non existent webpage. Please copy and paste into web URL when viewing.)
http://www.creativecrash.com/maya/downloads/character-rigs/c/the-andy-rig

The usefulness of the rig
Below are a series of GIF images showing the process of doing things with the rig.
When loading the rig in Maya, the file will set its renderer to Legacy Default Viewport, making it look low res. Ideally we want to change that to a higher res model by going to Renderer>Viewport 2.0. This will allow us to then choose the right settings for seeing the model in Maya. You can see the difference in the GIF below.


1. Select the Master Controller. This will bring up the list in which I can turn on the face sliders.

Changing IK to FK on arms and legs
Sometimes animating using IK can be good to do, but personally using FK too can help in areas. Below are two playblasts I made of the left arm using IK and FK. There is also another couple of playblasts showing IK and FK on the left leg too.

 To choose between IK and FK on the arm and leg, I had to locate the double arrow pointing both directions. This was the controller to change between IK and FK and it is shown on the left.
 Once selected, I had to go to the Channel editor and find the IK/FK editor. I had to type in either 0 or 1. 0 is for FK and 1 is for IK.
IK Arm
Using the IK chain on the arm made it easier to animate. Simply by selecting the hand controller (the green cube around the wrist) allowed me to either rotate or move the hand and arm to a position. I felt that this way it was easy to animate with, but less detailed than using an FK chain.
FK Arm
Using the FK chain was a little bit more complicated to do, but it had the detail supporting it. First I had to determine what I wanted the whole arm (shoulder, elbow and wrist) to do when the arm slumps down. I could only rotate the joints on the pivots only. This then allowed me to put in secondary motion and follow through when the arm goes down.
Concluding this bit, I found that using FK was a lot better than IK on the arm because the action I could put into the swing of the arm made it better with FK rather than IK.
IK Leg
I had also experimented with doing IK and FK legs. Using the IK allowed me to use move and rotate on the controller that shaped around the foot. If I wanted to, I could add in secondary motion with the channel box and manipulating the foot, toe and ball rolls when the foot lifted off the ground.
FK Leg
After this conclusion, I found that using IK was more suitable as I could control the pivots and rolls in between frames and keyframe them.
3D Character Animation story ideas
For my 3D character animation project, I had to work with either one more person or two to create a story and use a downloaded character from the internet that deforms nicely and can show expression. Below are a couple of ideas my group and I had thought about using for this project. For the ideas, I will list the pros and cons of each and explain which idea it was we chose to go with.
Football friends - Age group aimed at: children (4-11 years old)
The general idea for this was that there was a couple of friends playing with a football in a park and nearby was an old man painting in his home. One of the friends is good at playing, the other isn't. Seeing this, the good footballer demonstrates how to kick the football and show the other friend how it's done. When its the second friends turn, they kick the ball and accidentally sends it flying into the old man's house, smashing a window. The two friends then run away to avoid the old man's revenge, to which he then kicks the ball and sends it hurtling towards the good footballer. It's then apparent that the old man is an retired football player when it zooms in on his trophies he earned in his career.
Pros
- Simple story to portray
- Three characters between three people to use
Cons
- Have to create a lot of objects, taking out unnecessary time (house, trophies, carpets, bushes etc.
Man finds a genie and wants only one wish - Age group aimed at teenagers mostly (13-19 years old)
We came up with a story for the older generation of teenagers instead of making two stories for children. A man finds a lamp, rubs it and out comes a genie. The genie states the man has three wishes to use but he only needs one; the man asks for a woman and makes a gesture of curves. The genie thinks he wants a large vase and grants him it. Before the man sees his wish, he closes his eyes and begins to kiss the woman of his dreams only to find that it was a vase the genie conjures up. He gets annoyed and reiterates the woman, showing he wants to kiss her. The genie slightly understands the wish and grants him a fish, to which it then slaps the man in the face and flops away. Angry, the man shows what he wants (mimicking breasts) and finally gets a woman. Unfortunately for the man, the woman is ugly and he runs away, scared of her. The genie all along was playing with the man and then removes the "disguise" on the woman, revealing that she is actually beautiful. The genie then goes back inside his lamp and leaves the woman sad, seeing that her man has left.
Pros
- Funny story to portray, playing on the comedy genre
- Lots of movement to show off animation skills
Cons
- Over ambitious idea, could be difficult to animate all special effects (mask being taken off, Genie suddenly appearing)
- Possibly offensive towards some audiences watching it
- Animating too many rigs
Football idea revisited
We decided as a group to use the football idea as it was the better of the two and elaborate on it, cutting out some things that were going to over complicate the animation.
The two friends are passing a football between each other, one kicks it good, the other doesn't. The good footballer arrives where the ball is and watches as her friend runs in, tired out and disappointed with herself. The good footballer takes pity and has an idea to show her friend how to kick the ball. She takes a step back, kicks the ball and shows her friend to try out the technique. The bad footballer has a few attempts at kicking the ball until finally she does kick it. Suddenly, the bad footballer realises she kicks it way too hard and sends it hurtling towards an old man who is painting on a canvas. He finishes his masterpiece, takes a step back and admires it when suddenly it is ruined by the football. Angry, he turns around seeing the girls, who are shocked and kicks the ball back. The ball then hits the two girls on the head skillfully. Proud, the old man nods and smiles.
Subscribe to:
Comments (Atom)